Problem
As an Azure Data Engineer, capturing and storing Azure Data Factory (ADF) logs is crucial for monitoring, troubleshooting, and auditing data pipelines. However, integrating these logs with a robust data warehouse like Snowflake can be challenging. You might be wondering how to streamline this process, ensuring your logs are securely captured and easily accessible for analysis. Without a clear workflow, you may face difficulties in transferring and storing logs efficiently, leading to gaps in visibility and delayed decision-making.
Solution
To solve this challenge, follow these comprehensive steps that will guide you through capturing ADF logs and seamlessly storing them in Snowflake for real-time monitoring and future analysis. This approach ensures a centralized, scalable, and secure solution for managing ADF logs. Whether you’re dealing with performance monitoring, auditing, or simply want a clear overview of your data pipeline’s health, this process will help you unlock the full potential of your ADF logs within Snowflake’s powerful data storage environment.
Before diving in, it’s important to note that this guide assumes you have a foundational understanding of Azure services—specifically, how to create and manage resources like Azure Data Factory and Snowflake. Once set up, you’ll be able to automate the logging process and integrate it with Snowflake effortlessly, helping you keep track of your pipelines with greater ease and accuracy.
Snowflake part.
In snowflake we need to first create the log table and then we need to create a stored procedure.
- 1. Create the table.
--STEP 1: Create a Log table for ADF
create or replace table ADF_LOG(
DataFactoryName varchar(255),
TRIGER_NAME varchar(255),
Pipeline varchar(255),
RunId varchar(255),
DataSource varchar(255),
Destination varchar(255),
DataRead varchar(255),
DataWrite varchar(255),
Duration varchar(255),
ExecutionDetails varchar(16777216),
ErrorCode varchar(16777216),
ErrorMessage varchar(16777216),
Time varchar(255)
)
2. Create a stored procedure.
--Step 2: Create a stored procedure
CREATE OR REPLACE PROCEDURE ADF_PIPELINE_LOG_PRCDR(TRIGER_NAME varchar,DataFactoryName varchar,Pipeline varchar,RunId varchar,DataSource varchar,Destination varchar,DataRead varchar,DataWrite varchar,Duration varchar,ExecutionDetails varchar,ErrorCode varchar,ErrorMessage varchar,Time varchar)
RETURNS VARCHAR
LANGUAGE JAVASCRIPT
AS
$$
var command = “INSERT INTO TEST1140.PUBLIC.ADF_LOG (TRIGER_NAME,DATAFACTORYNAME,PIPELINE,RUNID,DATASOURCE,DESTINATION,TARGET_TYPE,DATAREAD,DATAWRITE,DURATION,EXECUTIONDETAILS,ERRORCODE,ERRORMESSAGE,TIME) VALUES (‘“+TRIGER_NAME+”’,’”+DATAFACTORYNAME+”’,’”+PIPELINE+”’,’”+RUNID+”’,’”+DATASOURCE+”’,’”+DESTINATION+”’,’”+DATAREAD+”’,’”+DATAWRITE+”’,’”+DURATION+”’,’”+EXECUTIONDETAILS+”’,’”+ERRORCODE+”’,’”+ERRORMESSAGE+”’,’”+TIME+”’)”;
var cmd1_dict = {sqlText: command};
var stmt = snowflake.createStatement(cmd1_dict);
var rs = stmt.execute();
return ‘success’;
$$;
3. Test the Stored procedure and make sure it is working properly.
-- Step 3: Test the stored procedure if it is working
CALL ADF_PIPELINE_LOG_PRCDR (‘Test’,’Test’,’Test’,’Test’,’Test’,’Test’,’Test’,’Test’,’Test’,’Test’,’Test’,’Test’,’Test’,’Test’);
If everything is working fine then it’s time to move in to Azure.
Azure Part
In Azure we are going to Linked service for Snowflake ,Linked Service for Azure Storage and then we are going to use a copy activity and Lookup activity.
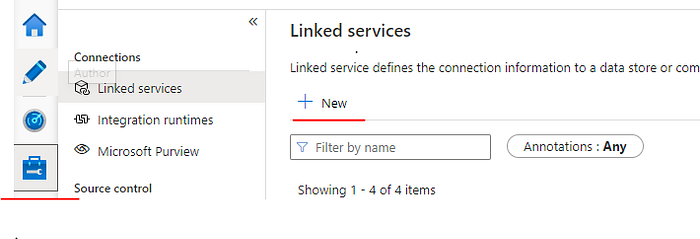
1. Create a Snowflake Linked Service.
In Azure Data Factory, Click on Manage then Linked Service and then ‘New’.
Search for Snowflake and provide all the details and finally test connection. If it is successful then save it.
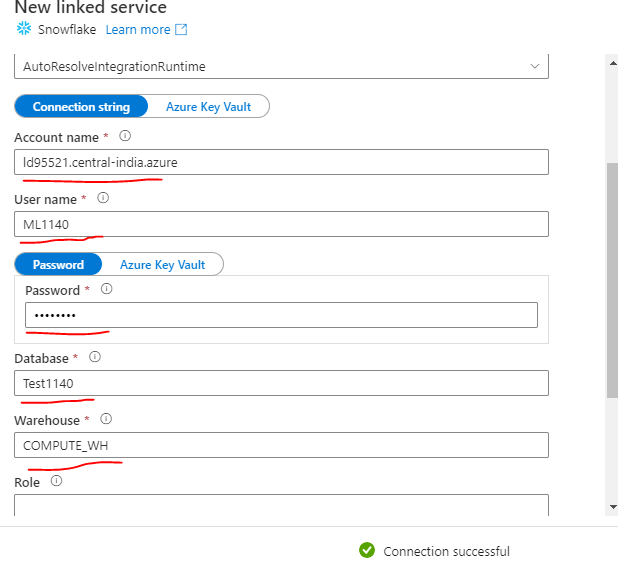
Note Best practice is to save the snowflake connection string in Azure Key Vault, snowflake connection string would look like this ‘jdbc:snowflake://<Account Name>.snowflakecomputing.com/?user=<USER NAME>&password=<Password>$&db=<Database>&warehouse=<Warehouse>’
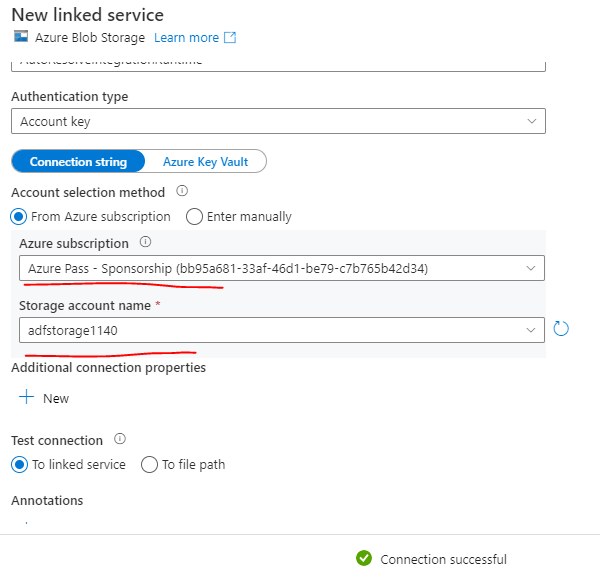
2. Create Azure Blob Linked Service.
Search for Azure Blob and click it the give all the required details. For this also it is recommended to store the blob secrets in Azure Key Vault.
Azure Pipeline
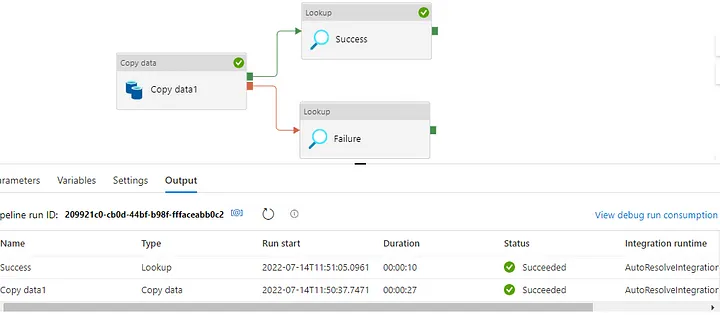
In Azure Data Factory ,in Author tab search for copy activity and drag it to the designer . Search for the lookup activity and drag it to the designer.
Since we want to capture the log for both success and failed pipeline our pipeline would look like.
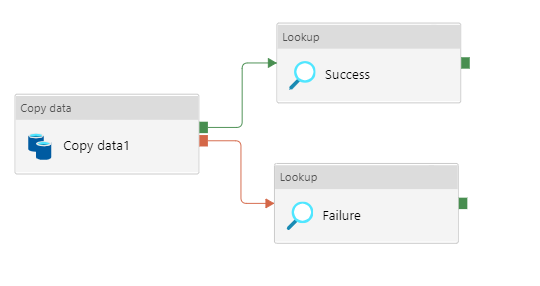
2. Now configure the copy activity by providing the the source and sink detail. For that we will be using the previously built linked services i.e Snowflake Linked Service and Azure Blob Linked Service.
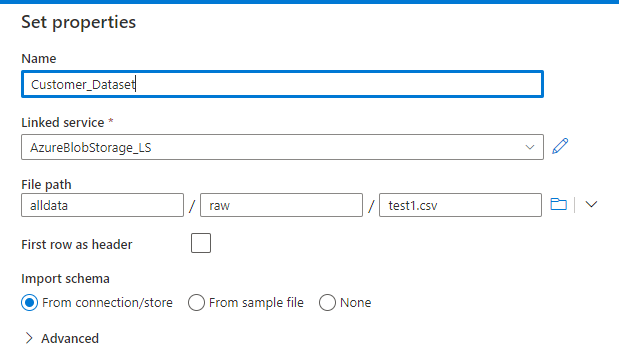
In source ,click on new →Search for Blob →Choose File Type →Give Name → Choose Linked Service →Select the file and then Click ok.
You can parameterize this dataset as well ,if you want to pass the file name dynamically.
Do the same thing for snowflake as well.

Lookup activity
Now we need to capture the ADF log if the pipeline runs successfully. In Lookup activity choose Snowflake linked service and Instead of providing the Table name choose Query because we want to call a stored procedure.
In success lookup activity, In Query section click on ‘Add dynamic content’ and copy-paste the below code.
CALL ADF_PIPELINE_LOG_PRCDR(‘@{pipeline().DataFactory}’,
‘@{pipeline().TriggerName}’,
‘@{pipeline().Pipeline}’,
‘@{pipeline().RunId}’,
‘@{pipeline().parameters.File_Name}’,
‘@{pipeline().parameters.Table_Name}’,
‘@{activity(‘Copy data1’).output.filesRead}’,
‘@{activity(‘Copy data1’).output.rowsCopied}’,
‘@{activity(‘Copy data1’).output.copyDuration}’,
‘@{activity(‘Copy data1’).output.executionDetails[0].status}’,
‘NA’,
‘NA’,
‘@{utcNow()}’
)
Note- File_name and Table_Name are the parameters that I have passed to the pipeline to provide the file name and table name at run time.
Next, apply the same steps for the failure lookup activity, and then copy and paste the code provided below.
CALL ADF_PIPELINE_LOG_PRCDR(‘@{pipeline().DataFactory}’,
‘@{pipeline().Pipeline}’,
‘@{pipeline().RunId}’,
‘@{pipeline().parameters.File_Name}’,
‘@{pipeline().parameters.Table_Name}’,
‘NA’,
‘NA’,
‘NA’,
‘@{activity(‘Copy data1’).output.executionDetails[0].status}’,
‘@{activity(‘Copy data1’).output.errors[0].Code}’,
‘@{replace(activity(‘Copy data1’).output.errors[0].Message,’’’’,’’)}’,
‘@{utcNow()}’)
Now that we have configured everything, it’s time to execute the pipeline and observe the results.
Next, proceed to validate the pipeline, and if you happen to encounter the error mentioned below during the validation process, please take note of it for further troubleshooting.
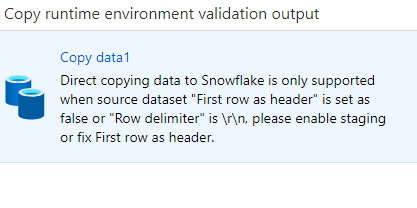
Then in the customer_dataset linked service you need to uncheck the ‘First row as header’ and set the row delimiter to ‘\n’ since I am loading the data from Blob to snowflake and if you are loading the data to any other database such Azure Sql you will not get this error.

Run the pipeline in debug mode and see the pipeline output and log in snowflake.

Success Log in snowflake.

Failed pipeline log along with error message.

We have successfully captured the ADF pipeline log and store it in Snowflake table.
Happy Learning !!